Category Archives: Jessups Appliances

3 Steps toward Optimizing Refrigeration in your New Kitchen

Refrigerator

If you’re setting up a new kitchen, either with a full remodel of the space or by replacing all of the major appliances, buying the right products will require the assessment of a variety of data points to ensure that each one can meet the demands of the household. When it comes to deciding on your refrigerator, the data points include:

  • Energy efficiency – As an appliance that is always running, the refrigerator will represent about 14 percent of the home’s total energy expenditure, second only to air conditioning at 16 percent. By limiting the refrigerators that are under consideration to only those ranked as the most energy efficient in their product category (which will include ENERGY STAR certified products), you can reduce the cost of running this appliance and realize incremental savings each month. The EnergyGuide label, which will be affixed to each refrigerator, provides a copious amount of data that will facilitate easy energy usage comparisons between similar products.
  • The size – In the decision process for a refrigerator, there are two different sizes that should be assessed; the dimensions of the space that has been designated for the refrigerator and the amount of storage capacity. Having the dimensions of the space is essential if the new refrigerator is being built-in, but is important even if the unit will be freestanding. Determining the right amount of capacity, which is the sum of the space in both the refrigerator and freezer compartments, depends on the number of people in the household and the characteristics of items that will be refrigerated or frozen at any given time. For example, a household of four people that shops every other day at the local grocery store will probably be fine with 18 to 20 cubic feet. On the other hand, if the same household shops at a warehouse store every two weeks instead, there will likely be a need for more storage capacity in both the refrigerator and the freezer.
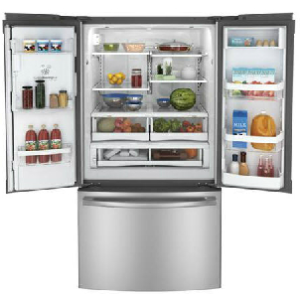
  • The door swing, particularly in small or galley-style kitchens – An open floor plan will likely be able to accommodate even the widest refrigerator door swing, but smaller spaces such as galley style kitchens may be completely cut off when the single doors of a top or bottom freezer mount are open. When space is limited, the shorter door swings of either a side-by-side configuration or a French door style can ensure that foot traffic can still move around the kitchen when the refrigerator doors are open.

With kitchens evolving into a space where family and guests gather for conversation and entertainment, even a large refrigerator can get crowded with food and beverages on occasion. If space constraints or large storage requirements threaten to stretch capacity, the addition of a specialty refrigerator designed to keep beverages, wine, and/or miscellaneous items cold can free up room in the primary refrigerator.

3 Signs that it’s Time to Clean the Condenser Coils on your Refrigerator

As far as the appliances in your kitchen are concerned, the refrigerator will likely be one of the more expensive purchases, will be an essential aspect in the day to day goings on in the house, and can last for up to 20 years if maintained properly. One of the most important steps in maintaining this appliance is cleaning the condenser coils which play an instrumental role in the cooling of the refrigerator and the freezer. If you’re not in the habit of engaging in this maintenance routine, your refrigerator may start providing hints that cleaning the coils is long overdue. These signs include:

  • The refrigerator isn’t running but the compartment light works – If the compartment light switches on when the door is opened, one issue that can be eliminated immediately is a problem related to electrical power. If cleaning the coils doesn’t fix the problem, unplug the refrigerator for two to three hours and then plug it back in. If it starts running but then shuts off after a short period, the problem may be the overheating of the condenser, which can result from the refrigerator being pushed against the back wall. Unplug it again and wait a couple of hours to let the unit cool down. When you plug it back in make sure to leave two inches of space to allow heat radiating from the coils to escape.
  • The temperature in the refrigerator and/or freezer is warmer than the settings – This problem can be caused by the trapping of heat, either by a thick layer of residues on the condenser coils that prevents its release or a lack of ventilation for heat that has radiated from the coils. If the temperatures in either the refrigerator or the freezer are too warm, first clean the coils and then examine how much space there is between the unit and the surrounding cabinetry. In addition to two inches of space from the back wall, there should be two to three inches of space on both sides and at least one inch of space at the top.
  • A motor that runs continuously – This may be another indication of dirty coils, but it can also occur after loading up a previously empty refrigerator or freezer compartment due to the initial warming that occurs just after items are put on the shelves. Another cause of a long or continuously running motor is a lowering of temperature settings in the refrigerator. In either of these situations, the motor should return to its normal operating cycle within 24 hours.

The condenser is the backbone of your refrigerator and the most costly component to replace. By sticking with a regular cleaning routine on the condenser coils once or twice per year, you can ensure efficient cooling and expect a many years of service from your new refrigerator.

How to Buy Scratch and Dent Appliances

Buying scratch and dent appliances is a great way to buy brand name refrigerators, ranges, dishwashers, laundry pairs, and more at significant discounts. True to their name, most appliances in this category have some sort of superficial damage that does not affect their operation, but other products may not be damaged at all. Here are three steps that can maximize your value when purchasing these products.

  • Determine why the appliance is being considered as a scratch and dent product – Appliances don’t necessarily have to be damaged to end up in a retailer’s scratch and dent department. In fact, you may find products that haven’t been damaged at all including closeouts, clearance items, floor models and products with open boxes. Many of these types of products offer a combination of never being used, no damage, and warranty coverage, all at prices that can be discounted by 40 percent or more. Keep in mind, however, that the majority of scratch and dent products will have some kind of damage, so don’t be discouraged if the product you are considering for purchase is cosmetically flawed.
  • Assess the area that has been damaged – If the product you are considering has some minor damage, take a quick look to see where it has occurred. Damage on the sides, back, bottom or top on an under-counter appliance is going to “disappear” after installation, meaning that you’re getting a product with no visible damage while saving a lot of money. Damage to these same areas on a free-standing model may also disappear if it has occurred on a side that will be adjacent to cabinetry or a wall.
  • Find out about repair options for damage that will be visible after the appliance is installed – If the damage has been incurred on a front facing or visible surface, you may still be able to do a repair or a replacement at little or no cost. Repair examples include scratches left behind by paint that can be rubbed off with compound and rounded dents on stainless steel that can be fixed using dry ice. Depending on the amount of the discount from the full retail price, replacing broken handles, hinges, surfaces, etc. can still result in a cost effective purchase.

Scratch and dent products offer the opportunity to buy new appliances at steep discounts. In many cases, the damage is hidden after installation or can be repaired to make the appliance look like new, which will leave you with a decision on whether to tell your friends about the great deal you got or to keep it a secret between you and the appliance retailer.

3 Steps to take Before Going to an Appliance Showroom

Showroom

Like most major purchases, doing some research and planning before heading out to the showroom to buy appliances will yield far better results than opting for spontaneity. If a purchase of multiple appliances is in your near future as part of a remodeling project, a move, or an upgrade of older models, take these three steps before going to the showroom.

  • Set a hard cap for your budget – Buying several appliances in a short period of time or in a single purchase can represent a significant investment with numerous temptations, such as add-on features that can push the overall expenditure far beyond what was originally planned. By setting a hard cap that represents a reasonable cash outlay, you can avoid problematic situations such as big balances on credit cards that never go away or needing to make cutbacks in other phases of a remodeling project. Once the cap is set, make “ballpark” allocations for each appliance that will be purchased to further define how much you have to spend on each one.
  • Decide on the features and capabilities that will be needed in each appliance in order to meet household demands – This is the step that will make the difference between a cost effective purchase and over spending on appliances. For example, if you’re accomplished at cooking a wide variety of dishes including delicate sauces, pan-seared meats, and soufflés, a pro-style range with convection will make for a great addition to your kitchen. On the other hand, if the same range will only be used for heating soup, cooking frozen pizza, and preparing pasta, a less expensive model will be a better choice.
  • Look for discount opportunities when buying multiple appliances in a single purchase – One of the opportunities of buying multiple appliances in a single purchase is that you may be able to buy them with steep discounts, either as a packaged deal or as part of a manufacturer’s rebate program. Package deals are put together at the dealership and can cost much less than buying each product separately. Manufacturers’ rebate programs offer customers the opportunity to assemble their own packages, with selections that include multiple model lines and the option to buy additional appliances such as laundry pairs for higher value rebates.

The best appliance purchases start by setting a hard budget, determining usable features/capabilities, and looking for discounts for multiple purchases. Taking these steps will then result in cost-effective purchases that meet the everyday demands of the household.

4 Hints that your Dryer’s Duct and Vent are Filling with Lint

gentlest dryer

According numerous studies, dryers account for approximately 15,000 house fires each year, most of them due to lint that fills the duct and vent to the point where trapped heat ignites the dry material like kindling. Part of the problem in these situations is that the buildup of lint occurs where it can’t be seen, but there are several hints that can indicate a potential problem if you know what to look for. Here are 4 of them:

  • Progressively longer drying times – A clogged duct/vent not only traps heat, it traps moisture too, creating a humid environment that can require increasing amounts of time for clothes to dry completely. If the time for your drying cycles has more than doubled, you need to clean the duct/vent out now.
  • The dryer and/or drying loads are hot to the touch – The inability to vent hot air will have it backing up into the dryer, heating the load as well as the machine to higher than ordinary temperatures. In the basin, the combination of high heat accompanied by high humidity is an indication of an impaired venting system.
  • A burning scent in the basin or outside the vent – A burning smell is indicative of a duct/vent that is trapping enough heat to start smoldering, a step that can directly precede ignition of trapped lint. In this situation, the best thing to do is to stop the dryer and check for the smell of smoke. If the smell goes away, call for a professional inspection as soon as possible. If the burning scent continues, call the fire department for immediate assistance.
  • A noticeable lack of air flow out of the vent – An unclogged vent will emit a firm flow of air during the drying cycle so if you don’t feel blowing air when you put your hand outside the vent, there is probably a significant clog in venting system. At this point, it’s best to shut the dryer down and either clear the vent yourself or call for a professional.

In addition to posing a fire risk, a lint-clogged duct/vent will make your dryer work progressively harder to get clothes dry, resulting in higher energy consumption and additional wear on the dryer’s machinery. To reduce fire risk, energy consumption, and wear on the dryer, take immediate action if any of the above mentioned issues are present and start a routine of clearing lint out of the vent/duct once every year.


4 Steps to Buy the Right Laundry Pair for your New Home

If you’re buying a new laundry pair as part of moving to a new home, there are 4 steps to take before heading out to the showroom to ensure that the washer and dryer will both fit and function in their intended locations.

  • Measure the space – If you’re buying a washer and dryer that will be going into an existing laundry room, take measurements of the dimensions of the space where they will be installed to determine whether you can buy side-by-side units or that a stackable pair will provide the best fit.
  • Check the existing plumbing and electrical configuration – If you’re moving into an older residence, make sure that the electrical outlets will work with your new appliances and that there aren’t any issues with plumbing before connecting your new appliances. When connecting the washer, use new stainless steel wire mesh hoses for hot and cold water to maximize your protection from damaging water leaks. Once the machine is in place run an empty load to make sure that drainage is working at 100 percent.
  • Determine the best side on each appliance for the hinges – If you laundry appliances are going to be positioned in the center of the room, the way in which the doors open may not be an issue, but it’s very important if they will be placed next to a wall or a doorway. By knowing where and how your laundry pair will be positioned, you can avoid situations where open doors block an entryway or require you to squeeze in between the door and the wall at the start and finish of every cycle.
  • Sort the features that will be used as well as the ones that won’t – New laundry pairs can be loaded with a myriad of features which can add value if they are used or just result in an unnecessary cost if they’re not. For example, if you’re already using your smart phone to connect with and operate your home security system and temperature controls, a feature that allows for remote starting of wash and drying loads probably makes sense. Otherwise, you’re just paying for capabilities that won’t be used.

Your new washer and dryer can make doing laundry chores far more convenient. By knowing the right size, configurations, and features that will add value, you can make informed choices in the showroom that will result in the perfect laundry pair for your new home.

Jessups Major Appliance Centers on 3 Tricks to Ways to Managing your Kitchen Remodeling Budget

If, after setting the budget for your kitchen remodeling project, you find that that there are some important aspects that just aren’t going to fit in, you can either re-do the budget or take 3 easy steps to manage and/or massage it. Typically, a do-over on the budget means that you’re going to be spending more than you had originally planned, which can quickly become problematic if credit cards are getting maxed out or the demolition reveals surprises that are also going to increase the cost of the project. If this feels like an unattractive choice, your next option is to see where the budget can be cut back while still delivering the desired result.

Here are three tricks that may help in this endeavor:

  • Open walls instead of knocking them down – Opening a wall is a less expensive option versus moving or knocking down a wall completely. While the space may not be opened completely, setting up a bar at the opening can still connect the kitchen to the adjoining room.
  • See if you really need custom cabinets – Installing new cabinets is typically the biggest slice of the remodeling pie, meaning that any savings that can be found in this area can be substantial. Custom cabinets, which are handcrafted over several weeks or even months, can represent over 50 percent of a remodeling budget, but may not be necessary if the kitchen has conventional architecture. Check to see if stock or semi-custom cabinets will work either as a total cabinet solution or whether they can be integrated with custom cabinets if there are specific areas in the kitchen that call for customized cabinetry work.
  • Rethink moving sinks, ranges, etc. – Many kitchen remodeling projects start with an idea that the whole space must be changed, which can raise costs considerably if plumbing and wiring has to be redone to accommodate appliances and other elements that have been moved from their original locations. Instead, rethink these moves as keeping even one element in its original location can save money. In many cases, if the overall footprint of the kitchen space is not being changed, installing the new appliances in the same places as the old ones will work while also reducing the budget for the project by a large margin.

Your kitchen remodeling budget doesn’t have to take an adversarial role in the process. Utilizing these budget tricks can free up substantial amounts of money within the budget that can be re-purposed to ensure that the project delivers the desired end result.

Why Buy a Portable Dishwasher?

Electrolux Dishwasher – Port Charlotte, Florida from Jessup’s Major Appliance Center on Vimeo.

The combination of advances in appliance technology as well as the trend toward smaller living spaces in urban areas is increasing the popularity of portable dishwashers. If you are moving to or living in a relatively small apartment or condominium or just have a tight kitchen space, purchasing a portable dishwasher can deliver five key benefits.

1) Convenience – Washing dishes in a dishwasher requires far less effort and time than washing them by hand. Portable dishwashers now offer a convenience that hasn’t been available in many small kitchens. Additionally, portable models carry many of the features of standard-sized models, including high powered water jets for scrubbing hardened residues, cycle options specific to the type of wash load, and food disposers that granulate residues to prevent clogging.

2)  You get a dishwasher than can be put away after each use – As living and kitchen areas get smaller, the importance of using space efficiently becomes more important. A portable dishwasher can be pulled out of a closet or other storage area to run wash loads and then be rolled back into storage when the job is finished. Being able to put the dishwasher away presents options to bring other appliances into the kitchen or to leave the space open to allow for more room.

3)  Efficient use of resources and energyPortable dishwashers use far less water and energy than traditional machines. Additionally, washing dishes in a portable dishwasher is more efficient than washing them by hand. While this may sound too good to be true, running full loads in a portable model will actually save money and require less time than the age-old chore of washing dishes, silverware, pots, and pans in the sink.

4) Versatility – Many portable models are also convertible, meaning that they can be used on a permanent under-counter basis. This eliminates the necessity of buying a new dishwasher after a move to a larger living space.

5)  Affordability – With portable dishwashers entering the mainstream, these appliances deliver high value at increasingly affordable prices. Additionally, the most energy efficient models are also certified by the ENERGY STAR program, which can increase affordability even further through rebates on purchases from local utilities and/or government agencies.

Why buy a portable dishwasher? With features that rival full-sized models, storage options, and energy efficiency at affordable prices, these machines offer a host of solutions for small kitchen spaces.

A Short Primer on Kitchen Hoods

Kitchen hoods may not receive the level of attention commanded by other major appliances such as refrigerators and ovens, but that doesn’t diminish the role that they play in keeping the kitchen environment clean and comfortable. If you’re in the process of remodeling, there are a number of kitchen hood styles to select from, with the best selection ultimately depending on the functionality you need and the design of your kitchen.

Kitchen hoods can first be divided into two categories, “ducted” and “ductless”. A ducted kitchen hood will transfer smoke, odors and steam from the kitchen to the outdoors via a duct that vents out of a sidewall or the roof. Ductless systems push collected vapors through a carbon or charcoal filter and then re-circulate the filtered air back into the kitchen. Between the two systems, ducted venting delivers a superior result and in most cases is the best choice when venting outdoors is a viable option.

Here is a list of the different types of hoods that are available as well as the circumstances in which they perform the best:

* Under cabinet hoods – These hoods are ideal when there are cabinets or shelves above the range. Available with a range of venting strengths, these hoods can be set up as either ducted or ductless systems.
* Chimney hoods – Like their namesake, chimney hoods run up the wall to the ceiling in the kitchen. These hoods can add a dramatic focal point to the kitchen and are often finished in eye-catching stainless steel.
* Island hoods – These hoods are suspended from the ceiling to provide venting for increasingly popular island based cooktops.
* Downdraft hoods – These hoods provide venting for island-based cooktops when ventilation via a hood is not an option. Generally speaking, downdraft hoods are more appropriate for lighter smoke/steam loads due to the fact that these systems capture a lower quantity of the vapors that rise naturally into a hood.
* Professional style hoods – Professional style hoods are available in all the above-mentioned styles, with the most significant difference being that they are designed with more venting power and capacity than standard models. Adding more power to your venting system can ensure that increased smoke and steam from ranges with professional-level BTU output are removed efficiently from the kitchen area.

The level of functionality of the kitchen hood you select can make a huge difference in air quality of your kitchen and your home. These venting systems can also marry form to their functionality, meaning that they can serve as focal points to define or complement the style of your kitchen.

Professional Chefs Still Prefer Cooking with Gas Ovens for These 5 Reasons

If you are one of the millions of people who watch one or more cooking shows during the week, you’ve probably noticed that the vast majority of dishes are prepared on gas powered ovens. Here’s why:

  • Chefs can monitor heat levels visually – The flame on a gas range allows chefs to gauge heat levels by sight to enable precise cooking temperatures.
  • Faster temperature adjustments – Gas burners allow for immediate heating adjustments as opposed to the more gradual changes that take place on an electric stovetop. Quick heating adjustments add another layer of precision to cooking with gas powered ovens.
  • Cookware options – An electric range will limit cookware choices to flat bottom pots and pans due to the fact that the transfer of heat will be hampered by any cookware that doesn’t have that shape. Options will be limited further by glass cooktops that require both flat and smooth cookware to reduce the potential of scratches. Convex-shaped cookware may also lack stability, which can cause spills. On the other hand, the grates of a gas range can hold a wide variety of shapes, won’t be damaged by rough bottoms on cookware, and the open flame will deliver heat efficiently. 
  • Durability – The grates on a gas oven can handle rougher treatment in the form of pots and pans being moved across the cooktop, which allows chefs to focus on preparing the meal rather than worrying about damaging the appearance of the range.
  • Off means off – A gas burner that is shut off stops generating heat at that moment, which can allow for cookware to remain in place on that burner. Electric heating elements cool down slowly and can require that the pot or pan be moved to stop the cooking process. This can be inconvenient if all burners on the cooktop are in use.

While both gas and electric ovens have their advantages, professional chefs still favor the gas-powered models. That doesn’t necessarily mean, however, that a gas oven will be the best choice for your kitchen. What is far more important is selecting the type of oven that works best for you, whether your cooking style leans toward gourmet dishes or more basic creations.